
Magento2 エクステンションの作成 その5
1. 概要
ここでは、新規登録ページと編集ページの表示を実装する(保存処理は次回)。
2. テンプレートの作成
まず、編集ページのlayoutファイルを作成する。layoutファイルの命名規則はMagento2 エクステンションの作成 その2でも説明したが、
./view/{area}/layout/{route_id}_{controller_name}_{action_name}.xml
のようなルールになっている。編集ページのURLはtopic/posts/edit/xxxxなので、view/adminhtml/layout/topic_posts_edit.xmlというレイアウトファイルを作成する。
view/adminhtml/layout/topic_posts_edit.xml
<?xml version="1.0"?>
<page xmlns:xsi="http://www.w3.org/2001/XMLSchema-instance" xsi:noNamespaceSchemaLocation="urn:magento:framework:View/Layout/etc/page_configuration.xsd">
    <head>
        <title>
            Posts
        </title>
    </head>
    <body>
        <referenceContainer name="content">
            <!-- -view/adminhtml/ui_component/topic_edit_form.xmlを参照 -->
            <uiComponent name="topic_edit_form"/>
        </referenceContainer>
    </body>
</page>
編集ページでは入力フォームを表示するが、これもGridと同じようにUI componentsを使って表示する。上記のレイアウトファイルでは、<uiComponent name="topic_edit_form"/>として、view/adminhtml/layout/topic_posts_edit.xmlを読み込んでいる。
次にview/adminhtml/layout/topic_posts_edit.xmlを作成して、フォームの内容を定義する。
view/adminhtml/ui_component/topic_edit_form.xml
<?xml version="1.0" encoding="UTF-8"?>
<form xmlns:xsi="http://www.w3.org/2001/XMLSchema-instance" xsi:noNamespaceSchemaLocation="urn:magento:module:Magento_Ui:etc/ui_configuration.xsd">
    <argument name="data" xsi:type="array">
        <item name="js_config" xsi:type="array">
            <item name="provider" xsi:type="string">topic_edit_form.topic_edit_form_data_source</item>
        </item>
        <item name="label" xsi:type="string" translate="true">Topic Information</item>
        <item name="template" xsi:type="string">templates/form/collapsible</item>
    </argument>
    <settings>
        <!-- 保存ボタン、戻るボタンの定義 -->
        <buttons>
            <button name="save" class="BitHive\Topic\Block\Adminhtml\Edit\SaveButton"/>
	    <button name="back" class="BitHive\Topic\Block\Adminhtml\Edit\BackButton"/>
        </buttons>
        <namespace>topic_edit_form</namespace>
        <dataScope>data</dataScope>
        <deps>
            <dep>topic_edit_form.topic_edit_form_data_source</dep>
        </deps>
    </settings>
    <!-- Modelにデータを読み込むためのDataProviderの定義 -->
    <dataSource name="topic_edit_form_data_source" component="Magento_Ui/js/form/provider">
        <settings>
            <submitUrl path="topic/posts/save"/>
        </settings>
        <dataProvider class="BitHive\Topic\Model\DataProvider" name="topic_edit_form_data_source">
            <settings>
                <requestFieldName>id</requestFieldName>
                <primaryFieldName>post_id</primaryFieldName>
            </settings>
        </dataProvider>
    </dataSource>
    <!-- フォームに表示する要素の定義 -->
    <fieldset name="post_details">
        <settings>
            <collapsible>false</collapsible>
            <label translate="true">Post Details</label>
        </settings>
        <field name="message" formElement="input">
            <argument name="data" xsi:type="array">
                <item name="config" xsi:type="array">
                    <item name="source" xsi:type="string">posts</item>
                </item>
            </argument>
	    <settings>
                <validation>
                    <rule name="required-entry" xsi:type="boolean">true</rule>
                    <rule name="max_text_length" xsi:type="number">255</rule>
                </validation>
                <dataType>text</dataType>
                <dataScope>message</dataScope>
                <label translate="true">Message</label>
            </settings>
        </field>
        <field name="date" formElement="input">
            <argument name="data" xsi:type="array">
                <item name="config" xsi:type="array">
                    <item name="source" xsi:type="string">posts</item>
                </item>
            </argument>
            <settings>
                <dataType>datetime</dataType>
                <dataScope>date</dataScope>
                <label translate="true">Date</label>
            </settings>
        </field>
    </fieldset>
</form>
3. コントローラーの作成
2.で作成したテンプレートを表示するコントローラーと関連する以下のファイルを作成する。
(1) Controller/Adminhtml/Posts/Edit.php
編集ページ用のコントローラー。
(2) Controller/Adminhtml/Posts/NewAction.php
新規登録ページ用のコントローラー。
(3) Model/DataProvider.php
フォームにデータを読み込むためのDataProvider。topic_edit_form.xmlの<dataProvider>で指定したクラス。
(4) Helper/Timezone.php
Timezoneの変換を行うヘルパークラス。
(5) Topic/Block/Adminhtml/Edit/GenericButton.php,SaveButton.php,BackButton.php
topic_edit_form.xmlで定義した保存ボタン、戻るボタンを実装するクラス。
まずは編集用ページのコントローラーであるController/Adminhtml/Posts/Edit.phpを作成する。
Controller/Adminhtml/Posts/Edit.php
<?php
namespace BitHive\Topic\Controller\Adminhtml\Posts;

class Edit extends \Magento\Backend\App\Action
{
    protected $pageFactory;
    protected $postFactory;

    public function __construct(
        \Magento\Backend\App\Action\Context $context,
        \Magento\Framework\View\Result\PageFactory $pageFactory,
        \BitHive\Topic\Model\PostFactory $postFactory)
    {
        $this->pageFactory = $pageFactory;
        $this->postFactory = $postFactory;
        return parent::__construct($context);
    }

    public function execute()
    {
        $postId = $this->getRequest()->getParam('id');

        $model = $this->postFactory->create();

        if ($postId) {
            $model->load($postId);
            if (!$model->getId()) {
                $this->messageManager->addError(__('This post no longer exists.'));
                $this->_redirect('*/*/');
                return;
            }
        }

        $resultPage = $this->pageFactory->create();

        $resultPage->getConfig()->getTitle()->prepend($postId ? __('Edit') : __('New'));

        return $resultPage;
    }
}
idパラメータからPostモデルを読み込みテンプレートを表示しているだけ。このコントローラーは新規登録時も使用するため、post_idが未指定のケースもある。post_idが未指定ならモデルの読み込みは行わずに、そのままテンプレートを表示する。
なお、モデルを生成しているPostFactoryはModel名+Factoryで自動生成されるクラスなので実装する必要はない。
次に新規登録ページ用のコントローラーController/Adminhtml/Posts/NewAction.phpを作成する。
Controller/Adminhtml/Posts/NewAction.php
<?php
namespace BitHive\Topic\Controller\Adminhtml\Posts;

class NewAction extends \Magento\Backend\App\Action
{
    protected $resultForwardFactory;

    public function __construct(
        \Magento\Backend\App\Action\Context $context,
        \Magento\Backend\Model\View\Result\ForwardFactory $resultForwardFactory)
    {
        $this->resultForwardFactory = $resultForwardFactory;
        return parent::__construct($context);
    }

    public function execute()
    {
        $resultForward = $this->resultForwardFactory->create();
        return $resultForward->forward('edit');
    }
}
これは、ResultForwardで'edit'に転送しているので、先程作成したEdit.phpを使用することになる。
次にフォームにデータを読み込むDataProviderを作成する。
Model/DataProvider.php
<?php
namespace BitHive\Topic\Model;

use Magento\Framework\App\Request\DataPersistorInterface;
use Magento\Framework\Stdlib\DateTime\TimezoneInterface;
use BitHive\Topic\Model\ResourceModel\Post\CollectionFactory;
use BitHive\Topic\Helper\Timezone as TimezoneHelper;

class DataProvider extends \Magento\Ui\DataProvider\AbstractDataProvider
{
    /**
     * @var DataPersistorInterface
     */
    protected $dataPersistor;

   /**
     * @var array
     */
    protected $loadedData;

   /**
     * @var TimezoneInterface
     */
    protected $timezone;

   /**
     * @var TimezoneHelper
     */
    protected $timezoneHelper;

    /**
     * @param string $name
     * @param string $primaryFieldName
     * @param string $requestFieldName
     * @param CollectionFactory $collectionFactory
     * @param DataPersistorInterface $dataPersistor
     * @param TimezoneInterface $timezone
     * @param TimezoneHelper $timezoneHelper
     * @param array $meta
     * @param array $data
     */
    public function __construct(
        $name,
        $primaryFieldName,
        $requestFieldName,
        CollectionFactory $collectionFactory,
        DataPersistorInterface $dataPersistor,
        TimezoneInterface $timezone,
        TimezoneHelper $timezoneHelper,
        array $meta = [],
        array $data = []
    ) {
        $this->collection = $collectionFactory->create();
        $this->dataPersistor = $dataPersistor;
        $this->timezone = $timezone;
        $this->timezoneHelper = $timezoneHelper;
        parent::__construct($name, $primaryFieldName, $requestFieldName, $meta, $data);
    }

    /**
     * Get data
     *
     * @return array
     */
    public function getData()
    {
        if (isset($this->loadedData)) {
            return $this->loadedData;
        }
        $items = $this->collection->getItems();
        foreach ($items as $model) {
            $this->loadedData[$model->getId()] = $model->getData();

            if ($this->loadedData[$model->getId()]['date']) {
                // UTC -> JST(設定上のタイムゾーン)
                $this->loadedData[$model->getId()]['date'] = $this->timezoneHelper->convertTz($this->loadedData[$model->getId()]['date'], $this->timezone->getDefaultTimezone(), $this->timezone->getConfigTimezone());
            }
        }

        $data = $this->dataPersistor->get('bithive_topic');
        if (!empty($data)) {
            $post = $this->collection->getNewEmptyItem();
            $post->setData($data);
            $this->loadedData[$post->getId()] = $post->getData();
            $this->dataPersistor->clear('bithive_topic');
        }

        return $this->loadedData;
    }
}
getData()メソッドに読み込み処理を実装する。ここではModelのデータをloadedDataに登録していくが、その際、dateカラムの時刻をWebサイト設定のタイムゾーンに合わせて変換している。この変換を行わないと、フォーム上にはUTCで表示される。
また、DataPersistorにデータがあればloadedDataに登録処理を行っているが、これは入力エラーがあった場合に、フォームの値を戻すための処理。
次に時刻のタイムゾーン変換を行うヘルパークラスの作成する。
Helper/Timezone.php
<?php
namespace BitHive\Topic\Helper;

class Timezone extends \Magento\Framework\App\Helper\AbstractHelper
{
    /**
     * @var Magento\Framework\Stdlib\DateTime\TimezoneInterface
    */
    protected $timezone;

    /**
    * @param \Magento\Framework\App\Helper\Context $context
    * @param \Magento\Framework\Stdlib\DateTime\TimezoneInterface $timezoneInterface
    */
    public function __construct(
        \Magento\Framework\App\Helper\Context $context,
        \Magento\Framework\Stdlib\DateTime\TimezoneInterface $timezoneInterface
    )
    {
        $this->_timezoneInterface = $timezoneInterface;
        parent::__construct($context);
    }

    public function convertTz($dateTime, $fromTz, $toTz)
    {
        $datetime = new \DateTime($dateTime, new \DateTimeZone($fromTz));

        $datetime->setTimezone(new \DateTimeZone($toTz));

        return $datetime->format('Y-m-d H:i:s');
    }
}
最後にtopic_edit_form.xmlで指定した保存、戻るボタンの実装を行う。まず、両ボタンで共通となる親クラスGenericButton.phpを作成する。
Topic/Block/Adminhtml/Edit/GenericButton.php
<?php
namespace BitHive\Topic\Block\Adminhtml\Edit;

use Magento\Backend\Block\Widget\Context;
use BitHive\Topic\Model\PostFactory;

/**
 * Class GenericButton
 */
class GenericButton
{
    /**
     * @var Context
     */
    protected $context;

    /**
     * @var PostFactory
     */
    protected $postFactory;

    /**
     * @param Context $context
     * @param PostFactory $postFactory
     */
    public function __construct(
        Context $context,
        PostFactory $postFactory
    ) {
        $this->context = $context;
        $this->postFactory = $postFactory;
    }

    /**
     * Return Post ID
     *
     * @return int|null
     */
    public function getPostId()
    {
        $postId = $this->context->getRequest()->getParam('post_id');

        $post = $this->postFactory->create();
        $post->load($postId);
        if (!$post->getId()) {
            return null;
        }
        return $post->getId();
    }

    /**
     * Generate url by route and parameters
     *
     * @param   string $route
     * @param   array $params
     * @return  string
     */
    public function getUrl($route = '', $params = [])
    {
        return $this->context->getUrlBuilder()->getUrl($route, $params);
    }
}
あとは、保存ボタンと戻るボタンを実装する。
Topic/Block/Adminhtml/Edit/SaveButton.php
<?php
namespace BitHive\Topic\Block\Adminhtml\Edit;

use Magento\Framework\View\Element\UiComponent\Control\ButtonProviderInterface;

class SaveButton extends GenericButton implements ButtonProviderInterface
{
    /**
     * @return array
     */
    public function getButtonData()
    {
        return [
            'label' => __('Save'),
            'class' => 'save primary',
            'data_attribute' => [
                'mage-init' => ['button' => ['event' => 'save']],
                'form-role' => 'save',
            ],
            'sort_order' => 90,
        ];
    }
}
Topic/Block/Adminhtml/Edit/BackButton.php
<?php
namespace BitHive\Topic\Block\Adminhtml\Edit;

use Magento\Framework\View\Element\UiComponent\Control\ButtonProviderInterface;

class BackButton extends GenericButton implements ButtonProviderInterface
{
    /**
     * @return array
     */
    public function getButtonData()
    {
        return [
            'label' => __('Back'),
            'on_click' => sprintf("location.href = '%s';", $this->getBackUrl()),
            'class' => 'back',
            'sort_order' => 10
        ];
    }

    /**
     * Get URL for back (reset) button
     *
     * @return string
     */
    public function getBackUrl()
    {
        return $this->getUrl('*/*/');
    }
}
4. 表示の確認
ここまでで、登録フォームや編集フォームが表示できるようになっているはず。テスト用のデータを挿入してあれば、一覧ページのEditリンクから以下のような編集フォームを表示できる。
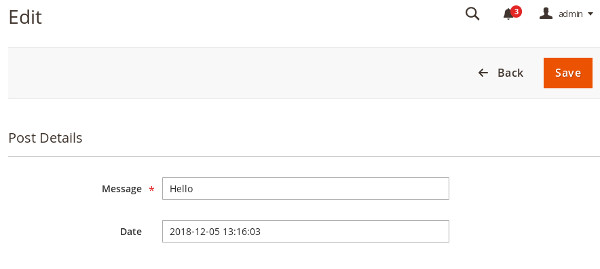
図1 表示されるフォーム
現時点でTopic配下は以下のようになっている。
./registration.php
./Model/ResourceModel/Post/Collection.php
./Model/ResourceModel/Post.php
./Model/DataProvider.php
./Model/Post.php
./view/adminhtml/templates/posts.phtml
./view/adminhtml/layout/topic_posts_index.xml
./view/adminhtml/layout/topic_posts_edit.xml
./view/adminhtml/ui_component/topic_edit_form.xml
./view/adminhtml/ui_component/topic_listing.xml
./Ui/Component/Listing/Columns/PostActions.php
./Setup/InstallSchema.php
./Block/Adminhtml/Edit/SaveButton.php
./Block/Adminhtml/Edit/BackButton.php
./Block/Adminhtml/Edit/GenericButton.php
./Controller/Adminhtml/Posts/Index.php
./Controller/Adminhtml/Posts/NewAction.php
./Controller/Adminhtml/Posts/Edit.php
./etc/module.xml
./etc/di.xml
./etc/adminhtml/menu.xml
./etc/adminhtml/routes.xml
./Helper/Timezone.php
今回はここまで。
現時点では、まだ保存処理を実装していないため、次回行う。Magento2 エクステンションの作成 その6に続きます。