
Magento2 エクステンションの作成 その7
Rev.1を表示中。最新版はこちら。
1. 概要
前回までで、管理画面側の実装は完了したので、最後に投稿した記事をフロント側に表示する実装を行う。管理画面側の実装と同じように以下の作業を行う。
- routeの作成
- コントローラーの作成
- テンプレートの作成
2. Routeの作成
まず、Routeを作成する。フロント側のRouteはetc/frontend/routes.xmlで定義する。
etc/frontend/routes.xml
<?xml version="1.0" ?>
<config xmlns:xsi="http://www.w3.org/2001/XMLSchema-instance" xsi:noNamespaceSchemaLocation="urn:magento:framework:App/etc/routes.xsd">
    <router id="standard">
        <!--
         standard routerでは以下のようなURL形式になる。
         <store-url>/<store-code>/<front-name>/<controller-name>/<action-name>
         idは通常frontNameと同じものを指定する。
         -->
        <route frontName="topic" id="topic">
            <module name="BitHive_Topic"/>
        </route>
    </router>
</config>
これは、/topicへのRouteを定義している。
3. コントローラーの作成
次に/topicで記事を作成するためのコントローラーを作成する。routes.xmlで定義したRoute(/topic)のトップで表示するため、コントローラーはController/Index/Index.phpとなる。
Controller/Index/Index.php
<?php
namespace BitHive\Topic\Controller\Index;

class Index extends \Magento\Framework\App\Action\Action
{
    protected $pageFactory;
    protected $postFactory;

    public function __construct(
        \Magento\Framework\App\Action\Context $context,
        \Magento\Framework\View\Result\PageFactory $pageFactory,
        \BitHive\Topic\Model\PostFactory $postFactory)
    {
        $this->pageFactory = $pageFactory;
        $this->postFactory = $postFactory;
        return parent::__construct($context);
    }

    public function execute()
    {
        return $this->pageFactory->create();
    }
}
このコントローラーはPageFactoryでページデータを作成して返しているだけ。このページのlayoutファイルはview/frontend/layout/topic_index_index.xmlとなる。
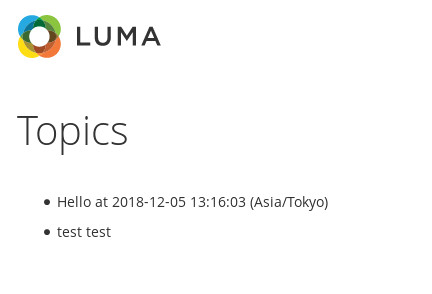
4. テンプレートの作成
/topicページのlayoutファイル(topic_index_index.xml)を作成する。
view/frontend/layout/topic_index_index.xml
<?xml version="1.0"?>
<page xmlns:xsi="http://www.w3.org/2001/XMLSchema-instance" xsi:noNamespaceSchemaLocation="urn:magento:framework:View/Layout/etc/page_configuration.xsd">
    <head>
        <title>
            Topics
        </title>
    </head>
    <body>
        <referenceContainer name="content">
            <block class="BitHive\Topic\Block\TopicList" template="BitHive_Topic::topic.phtml"/>
        </referenceContainer>
    </body>
</page>
Block/TopicList.php
<?php
namespace BitHive\Topic\Block;

class TopicList extends \Magento\Framework\View\Element\Template implements \Magento\Framework\DataObject\IdentityInterface
{
    protected $postFactory;
    protected $timezone;
    protected $timezoneHelper;

    /**
     * Post Collection
     *
     * @var AbstractCollection
     */
    protected $postCollection;

    public function __construct(
        \Magento\Framework\View\Element\Template\Context $context,
        \BitHive\Topic\Model\PostFactory $postFactory,
        \Magento\Framework\Stdlib\DateTime\TimezoneInterface $timezone,
        \BitHive\Topic\Helper\Timezone $timezoneHelper
    ) {
        $this->postFactory = $postFactory;
        $this->timezone = $timezone;
        $this->timezoneHelper = $timezoneHelper;
        parent::__construct($context);
    }

    public function getPostCollection()
    {
        $collection = $this->postFactory->create()->getCollection()
                    ->setPageSize(5)
                    ->setOrder('date', 'DESC');

        return $collection;
    }

    private function _getPostCollection()
    {
        if ($this->postCollection === null) {
            $collection = $this->postFactory->create()->getCollection()
                        ->setPageSize(5)
                        ->setOrder('date', 'DESC');
            $this->postCollection = $collection;
        }

        return $this->postCollection;
    }

    // トピック更新時に自動でキャッシュをクリアさせるために実装。
    //
    // ブロック内に表示するPostモデルのIdentitiesの一覧を返すことで、
    // 関連Postモデル更新時に本ブロックを含むページのfull page cacheが
    // クリアされる。
    // キャッシュの更新が不要ならIdentityInterfaceは実装しなくてよい。
    //
    // 参考: app/code/Magento/Catalog/Block/Product/ListProduct.php
    public function getIdentities()
    {
        $identities = [];

        foreach ($this->_getPostCollection() as $item) {
            $identities = array_merge($identities, $item->getIdentities());
        }

        return $identities;
    }
}
view/frontend/templates/topic.phtml
<ul>
<?php
foreach ($this->getPostCollection() as $item) {
    $dateString = $item['date'] ? ' at ' . $item->getConvertedDate('Y-m-d H:i:s (e)') : '';
    echo '<li>' . $item->getMessage() . $dateString . '</li>';
}
?>
</ul>
編集中